Sunday, 5 November 2017

CD Sunday - Take a Stamp

At CD Sunday this time it's Carol's turn to pick a theme and she's chosen 'Take a Stamp'.
The design team decide on themes well ahead of the date that they're published on the challenge blog. When I was thinking of making my card for this theme, back in June, my husband asked me to make some cards for the staff at the local cancer centre. He was due to have his final chemotherapy session and wanted to thank the staff for making the time he spent there as pleasant and stress free as possible.
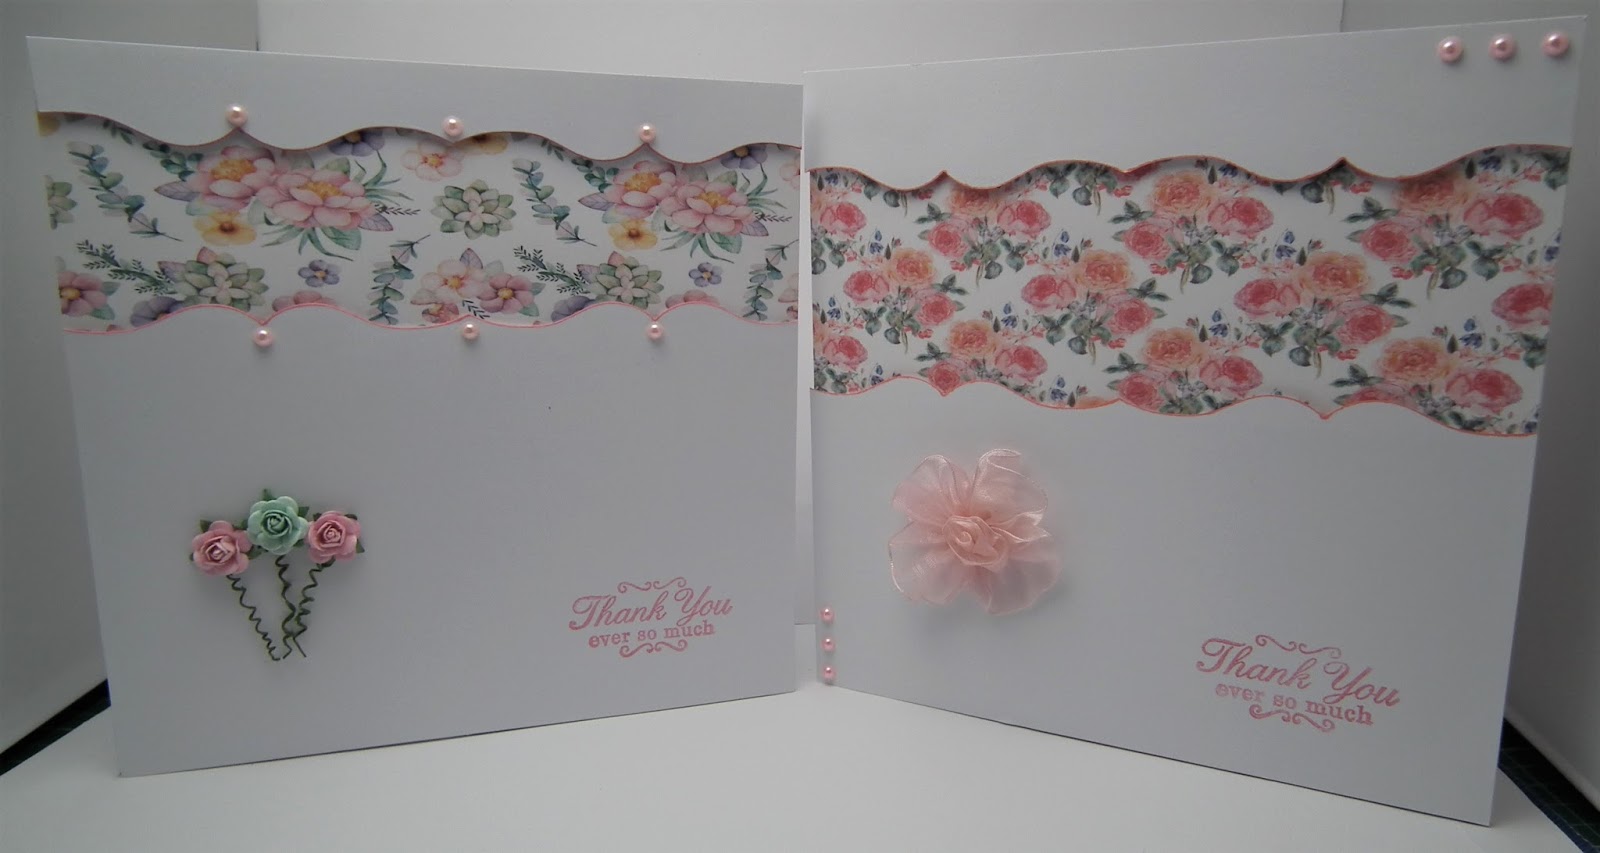
I'd seen a design in Papercraft Essentials magazine (issue 147) that I'd wanted to try so made these cards for the staff on the two wards that had treated him.


I printed the backing paper from a My Craft Studio Cd called 'Field of Flowers' which was then glued to the front of an 8 by 8 card. I then took another piece of white card and removed a section using a die. I used the outer edge die from Clematis Climber Strip Die Set by Tonic. I then inked the edges of the white card with a toning colour. The sentiment was then stamped in the same colour ink in the bottom right hand corner. The stamp was from a set of sentiment stamps free with Cardmaking and Papercraft magazine. 


I embellished the cards slightly differently. The first one had pearls along the cut and inked edge and three flowers grouped together.


The second card I grouped the pearls at the edges of the card and glued a ribbon rosette to the front.


Hubby bought boxes of biscuits for both the wards and the staff thanked us both and quizzed me about how I'd made the cards.
The CD Sunday challenge is all about making items using craft CD Roms. You can use other craft items on your card/project, such as a stamp as in this theme, but you must include something from a CD. So if you like colouring stamped images or digis you can still enter the challenge but you must include something from a CD such as a backing paper, a sentiment or a butterfly for example. In your blog post you must give the name of the CD you've used. This is especially important if the items you've used can be bought as a download as well as a CD as the Design Team can't tell which has been used unless you tell us. Your card can't be considered for a prize if you haven't used a CD or if you haven't told us the name of the CD in your post. The Design Team still leave comments on the blogs but there's no chance of winning if the above hasn't been followed. 
The challenge runs until Saturday 18th November at 13:00.


Sunday, 22 October 2017

When Autumn Leaves Start To Fall - CD Sunday

It's time for a new theme at CD Sunday - am I the only one who thinks the weeks are just flying by?
The last challenge at CD Sunday didn't attract many entries, are you all knee deep in making your Christmas cards? It is only 9 weeks to the big day so perhaps I ought to join you LOL! Margaret will pick her top three winners and there is a prize for her first choice. The winner will be announced in 2 weeks time on Sunday 5th November - oooh that's Bonfire Night LOL!
The CD Sunday challenge is all about making items using craft CD Roms. You can use other craft items on your card/project but you must include something from a CD. So if you like colouring stamped images or digis you can still enter the challenge but you must include something from a CD such as a backing paper, a sentiment or a butterfly for example. In your blog post you must give the name of the CD you've used. This is especially important if the items you've used can be bought as a download as well as a CD as the Design Team can't tell which has been used unless you tell us. Your card can't be considered for a prize if you haven't used a CD or if you haven't told us the name of the CD in your post. The Design Team still leave comments on the blogs but there's no chance of winning if the above hasn't been followed. 
This time it's Jocelyn's turn to pick the theme and she's gone for 'When Autumn Leaves Start To Fall'. I knew straight away what I wanted to make as I've previously made a similar card for a monthly card swap (back in September 2013!).


The first stage was to make an stepper card. I have a set of dies that make a side stepper card but I wanted the 'steps' to be a certain height so the first attempt made using the dies went in the bin. I then searched the net for templates and instructions for various designs but after my fourth attempt ended up in the bin I made my own!


I then cut mats from dark brown card to fit the three sections. I used rectangle dies with a stitched edge from The Works (£5!). The dies weren't quite long enough so I only ran the card part way through my machine then moved the die to the length I needed and run it through the machine again. The second mat is a design printed from a CD and the same process used to lengthen the mat. The backing paper design I used is from DoCrafts Digital Designer and is called Woodland Folk and Friends. I used the Woodland Folk section called Everyday but lightened it a touch.


I inked up a piece of white card with 4 Distress Inks - Scattered Straw, Dried Marigold, Festive Berries and Vintage Photo. I left it to dry overnight and then used it to die cut all the leaves. These large leaves were cut using Creative dies that were free in a craft magazine. The words 'Autumn' and 'Leaves' are cut using Tonic DuoCap Initials - Pretoria Dies.


The tree was cut out three times from card and all glued together to make it stronger as I wanted it to overhang the edge of the card. It's glued to the card using silicon glue to raise it up from the card. The tree die is from Die'sire called Four Seasons and these leaf dies are from a Signature Collection - Autumn Morning by Sara Davies called Tumbling Leaves.


This pile of leaves were cut using dies in the set with the tree die. The acorn die is an XCut set called Woodland Gift Tags. There's lots of tiny dies in this set - perfect for using on ATCs. The hedgehog was a free die with Papercrafter magazine issue 111.
I'm really pleased with how the following leaves turned out. I think the colours of the Distress Inks worked well. I bent the edges of the leaves up and only glued along the middle vein using silicon glue so they stood out from the card.


But my favourite part of this card is this little hedgehog!


Isn't it cute? Hubby and I have several hedgehogs visiting our garden and put food out for them. 
This theme runs until Saturday 4th November at 13:00 and Jocelyn will choose her top three favourites from the entries. Her chosen number one will receive a prize so make sure you get your entries in on time and to include something printed from a craft CD - Good Luck!

Sunday, 8 October 2017

For The Love Of Dogs - CD Sunday

At CD Sunday this time the theme is 'For The Love Of Dogs' which has been chosen by Margaret. When I saw the theme I wasn't too happy with Margaret! Cats I can do - I adore them, but did I have anything dog related? So I started looking through my stash and came across some cat stamp and dies that I'd bought recently and there were dogs as well as cats! Phew - Tim Holtz to the rescue LOL! You're forgiven Margaret!
My most recent sister - in - law runs a dog walking business and it's her birthday on 23rd Deember. She misses out with her birthday being so close to Christmas so I thought I'd go over the top and make her something really special. As well as running her business she owns two gorgeous dogs. Bess has been with her for a few years and Denver is one year old. I talked my brother into emailing me some photos of the dogs so I could personalise my project. So I now had loads of doggie images to use and decided a pop up box card would be the best way to show them off. I've never made one before so turned to YouTube where I found a brilliant video that shows a very simple way to make one. I you want to look it up search for 'pop up box card' and find the one by Sabrina Radeck.
As my SIL's dogs are mainly black I made the box out of black card from Creative Crafting World - Linda's black card. I also needed an element from a CD so printed off a paw print paper from Sharon Duncan's Embossibilities Celebration Cd. Out of the 22 colours I chose a light grey. I found it easier to decorate the sides and flaps of the box while it was flat, before gluing the sides together. You can do it afterwards if you want as the box closes flat for putting into an envelope. The pop up dogs were all added after the box was made in order to have them at different heights and so they could all been seen from the front. They're glued to stripes of acetate of varying lengths.

There's now lots of photos following this and you don't have to read any thing after them if you don't want to. After the photos I've explained how I did all the pop up dogs as I used a clever technique to line up stamps and their matching dies. And also there's a little bit about the real dogs.


This is the box closed ready to go in the envelope. The paw print paper is the one from the Cd. I added more die cuts from the same set as the dogs. The paper clip is only there to hold it closed for the photo. 


The CD Sunday challenge is all about making items using craft CD Roms. You can use other craft items on your card/project but you must include something from a CD. So if you like colouring stamps or digis you can still enter the challenge but you must include something from a CD such as a backing paper, a sentiment or a butterfly for example. In your blog post you must give the name of the CD you've used. This is especially important if the items you've used can be bought as a download as well as a CD as the Design Team can't tell which has been used unless you tell us. Your card can't be considered for a prize if you haven't used a CD or if you haven't told us the name of the CD in your post. Now you may think that these instructions are easy enough but in every challenge we have entries that can't be picked as a winner. The Design Team still leave comments on the blogs but there's no chance of winning if the above hasn't been followed. 

This theme runs until Saturday 21st October at 13:00 and Margaret will choose her top three favourites from the entries. Her chosen number one will receive a prize so make sure you get your entries in on time and to include something printed from a craft CD - Good Luck!


Aligning stamps with the matching die cuts:

The stamps I used were from Stampers Anonymous by Tim Holtz and is called Mini Cats and Dogs CMS272.
The matching dies are Sizzix Framelits by Tim Holtz and they are called Mini Crazy Cats and Dogs 661594.

I can't claim this technique as my own, I've read it in several craft magazines and also on Face-book craft groups.
Take a piece of card and cut out your die - keep the 'waste' piece that you would normally throw away. I used the Tim Holtz/Tonic Stamping Platform to do my stamping but you may find other ways of lining things up. I placed a scrap piece of card onto my stamping platform, put my stamp in the middle of the card and closed the lid, which picks the stamp up. Ink the stamp and close the lid to leave an impression on your piece of card. Now take the 'waste' piece with the die cut shape cut out and line it up over your stamped image. Make sure you don't move the stamped image while doing this. Either tape the die cut waste down or use magnets to hold it in place. Now place your die cut shape from earlier back into the piece of card you'd cut it from. Re-ink your stamp and close the lid, when you open the lid again you will have the image stamped centrally onto your die cut! Simples! 
There's no other way I would have been able to stamp and die cut these eyes/noses/tongues etc.


Introducing the stars of the show:


This is Bess, she's a working dog and helps my SIL keep the other dogs under control when they are being walked. She's always waiting to be given instructions on what is expected of her from my SIL. She was ring barer at my brother and SIL's wedding last year and she stole the show and everyone's hearts.
This handsome young man is Denver. He's only one year old and he's grown so big in that time. He's full of energy and loves nothing more than to be splashing around in water. He also likes watching TV especially the sheep dog trials on Country File - I kid you not!

This is the two dogs together - Denver certainly knows that Bess is the boss!

Sunday, 24 September 2017

Mellow yellow - CD Sunday

The CD Sunday challenge is all about making items using craft CD Roms. You can use other craft items on your card/project but you must include something from a CD. So if you like colouring stamps or digis you can still enter the challenge but you must include something from a CD such as a backing paper, a sentiment or a butterfly for example. In your blog post you must give the name of the CD you've used. This is especially important if the items you've used can be bought as a download as well as a CD as the Design Team can't tell which has been used unless you tell us. Your card can't be in considered for a prize if you haven't used a CD or if you haven't told us the name of the CD in your post. Now you may think that these instructions are easy enough but in every challenge we have entries that can't be picked as a winner. The Design Team still leave comments on the blogs but there's no chance of winning if the above hasn't been followed. OK enough of that onto my card for this theme.
Mellow Yellow is the new theme for the CD Sunday Challenge picked by Wynn. 
Mellow Yellow brought to my mind an image of a sun with the rays branching out from the centre. So I was quite pleased when I opened Papercraft Inspirations magazine, issue 167, and found a guide on how to make Starburst cards. 
I had to use yellow in the design, as per Wynn's theme, and knew that Kraft card went well with yellow so I set about looking through my craft CDs for backing papers that went together.
This is my finished card, which includes a few 'firsts' for me:


I started with a cream card blank and covered it with Kraft card which was then covered with the first of the backing papers - that was the easy, quick bit done LOL!
For the starburst/sunray effect I chose 3 further backing papers which were cut into 11 cm lengths but different widths. Here comes one of the firsts! Each piece had to have the edges inked and I always shy away from this as I make a right mess. I used Frayed Burlap Distress Ink and I'm pleased with how it turned out although it's not very noticeable in the photos. These rectangles were then cut in half to make triangles which were glued onto Kraft card. 
A second, smaller rectangular mat of Kraft card was covered with the spotty backing paper and the triangles were then arranged to form the sunburst. I used foam tape to raise them up from the spotty paper. The triangles are made to be too long for the mat so you then cut off the overhanging edges.
Time for the another first! A faux stitch effect was added to the papers with a black fine liner. I made a right mess of this with different sized stitches and wonky lines. I've since read somewhere to use a piece of card in order to keep the lines straight. If you use a plastic ruler the ink can stay wet on it and then smudge your paper.


I then added my own take on the design by making a faux bow and sticking the bow and a length of ribbon to a piece of Kraft card and placing it along the lower half of the design. The ribbon was taken around the back of the mat and glued in place. The whole layer was then glued to the prepared card blank. To cover the area where the 'rays' join together I die cut a scalloped circle from Kraft card and a plain circle from yellow card. A sentiment was then stamped onto the yellow card.
I finished the card by glueing yellow dew drops onto the centre of the ribbon and the centre of the sentiment. Finally I added some really tiny dew drops to the top right and bottom left of the second layer of Kraft card - again they're difficult to see in the photos.


The challenge runs until Saturday 7th October at 13:00. Please don't forget to include something from a Cd!

The CDs I used are all from Creative Crafting World - Perfect Essential Companions, Perfect Forever Companions and Perfect Floral Companions.


Sunday, 10 September 2017

Clean and Simple - CD Sunday

Thanks to everyone who entered my challenge 'Let's Hear It For The Boys'. I'll be picking a Top Three and the winner will receive the prize that I have ready and waiting to go in the post. Sadly a few people either didn't use something from a CD or didn't name the Cd in their blog post so can't be considered for the prize.
This time it's Meg who has chosen the CD Sunday theme and she has picked 'Clean And Simple'. A perfect theme if you need to make a card in a hurry as there's no need to use loads of mats and layers or embellishments.
I decided to add to my Christmas card supply and I knew where to head for some lovely papers and images - DoCrafts Digital Designer. Sadly this isn't available anymore which is a shame as it has some really lovely designs. 
I chose Henbury Lane - Poinsetta.


I put the design together on screen using an image of some presents layered onto a very pale green paper,a sentiment in a darker shade of green and a pale green mistletoe design backing paper. I was going to print it out as one layer but decided the image surrounded by the pale green paper wasn't standing out and that it needed a white mat between it and the mistletoe paper.
After I'd printed it I cut the image out using a Tonic Studio Essentials Mixed Edge Oval Layering Basic die (could they have made the name any longer?). I thought I'd used the right size oval die but it was a little to big and left a very small white edge. When I tried the topper on the backing paper I decided I liked the look so I then cut the BP slightly smaller than the card front leaving a small border of the white card to match.
I only added holly corner peel offs to finish the card and my Clean And Simple card was complete!


Meg's theme runs until Saturday 23rd September at 1 pm. Don't forget to follow the 2 rules - you must use something from a craft Cd and you must name that Cd in your blog post. You can use a download on your card as long as you also use something from a Cd. So you could use a downloaded image with a backing paper from a Cd for example. Meg will pick her Top Three cards/projects and has a prize for the winner - good luck!