Sunday 29 April 2018

Anything Goes - CD Sunday

Well what a response we had to the CD Sunday Birthday Challenge! Thanks to everyone who entered but especially those who entered for the first time. The design team will now ponder long and hard and come up with two people to win the prizes. The names of the winners will be announced on Sunday 13th May to give us time to come to a decision - not an easy task as there were so many wonderful entries.
The theme for the next 2 weeks has been chosen by Wynn and she's gone with 'Anything Goes'. A really easy theme so let's so lots of entries again!
Don't forget that the CD Sunday Challenge is about making items using something printed from a craft CD Rom. You can use other craft items on your card/project, such as a stamp or die, but you must include something from a craft Cd. So if you like colouring stamped images or digis you can still enter the challenge but you must include something from a Cd such as a backing paper, a sentiment or a butterfly for example. In your blog post/Facebook entry you must give the name of the Cd you've used. This is important if the items you've used can be bought as a download as well as a CD as the Design team can't tell which has been used unless you tell us. Your entry can't be considered for a prize if you haven't used a Cd or if you haven't told us the name of the Cd in your post. The Design team still leave comments on your blog but there's no chance of winning if the above hasn't been followed.
Today is my husband's birthday and as the theme is Anything Goes I thought I'd make something for his birthday. One of his hobbies is to feed the wild birds in the garden - we have feeders everywhere! He likes to sit in the dining room and watch the birds through the patio doors. It gives him a great deal of enjoyment so when I saw how to make a bird house from card it was the obvious choice! Michelle Jackson-Mogford has a feature in the Crafter's Inspiration magazine (issue 17) from Crafter's Companion. If you recognise her name Michelle used to demo Craft Artist on Create and Craft. You can download the birdhouse template from www.crafterscompanion.co.uk/ci17-liliesandlight
I didn't follow the article in the mag completely - I used different papers to Michelle as she used purples. I used a green paper from Issue 11 CD Autumnal Days folder and 3 blue papers from Issue 17 CD Tokyo Blue folder.


The little bird was one of a pair left over from a previous project. Michelle printed her bird from the files on the CD but I knew I had this one, bought from The Range, in my stash.
I just poked a small piece of stick through for him to sit on.
Michelle punched hearts to make the roof 'tiles' but when I saw this paper on CD 17 I thought it looked like roof tiles - what do you think?


I decorated the 2 sides and back with dies cuts using Tonic's Craft Perfect card in Fern Green and two different sized dies from Cheery Lynn. 


The front was decorated with strips of clear gems and die cuts from a Tonic With Love set. I used plain white card and after cutting out the dies I coloured the card using a Tonic Glitter marker.
This is where I confess to a little 'cheating'! Anyone who follows my blog will know I don't enjoy cutting things out by hand. Having already cut loads out for the rest of the birdhouse I didn't fancy cutting the roof trims out by hand - too small and fiddly for me. So I rummaged through my stash and found an edging die that looked just like the pretty decorations that hang from roofs and used that! I edged it with a French Navy Promarker and dotted tiny hearts along it. I think it worked! 


We now have a Facebook page if you don't have a blog or if it's easier for you to enter that way - The CD Sunday Challenge.


Sunday 15 April 2018

CD Sunday's 8th Birthday Celebrations!

On the 18th April the CD Sunday Challenge Blog will be 8 years old! Are lovely design team leader, Carol, is also celebrating a very special birthday on 21st April - she will be 75. So we have combined the two celebrations and the theme for the next two weeks is Birthday. Along with the usual rule that you must include something from a craft CD you must also follow this sketch:


You don't have to use the sketch as it is, you are allowed to flip or turn the design - which is what I've done for my card. But before I show my card I must just add that there are prizes for the top two entries. Carol has donated a brand new pack of Chameleon pens as the first prize and the second prize is a set of Tonic dies - Essentials Ribbon & Bow Layering Dies donated by me.So with such a straightforward  great prizes it would be a shame not to enter! The theme runs until Saturday 28th April at 13:00.
There's not a lot of work gone into the making of my card as the sketch is so easy to follow. 


I made an A5 card blank and covered it with a backing paper from a My Craft Studio CD called Magical Midnight. The next two layers, the deep pink and the glitter card, are both Tonic Craft Perfect card. I then cut two strips of blue mirri card and run them through an old embossing folder. Remember the early days of embossing folders? There weren't many companies making them and I'm sure we all have folders for the Cuttlebug made by ProvoCraft. This one is called Swiss Dots. These were glued into position as per the sketch. I then cut the ovals and backing oval from some pearl card (similar to Centura Pearl) and glued them into place. They were cut using a Marianne Design set - Passe-Partout Oval CR1241.


I then coloured a number 4 and 0 with a Cornflower Blue Promarker to fit in with the colour scheme and finished the ovals off by adding blue gems.
I've deliberately left the description of the die cut flowers until last - they're my favourite bit!


The My Craft Studio CD rom that I used for the backing paper (Magical Midnight) can be used with several different sets of dies. I printed off the flowers from the 'Handpicked' section then used the matching die to cut them out. When you see the image printed out it looks a little odd but as soon as you die cut it the flowers come to life - at least I think so! There are 4 sets of dies that match the various images on the CD and I think I'll be using them a lot.
I hope everyone has a go at entering the challenge this time - it would be a shame to miss out on the challenge celebrations - and of course the chance of winning a prize!
Don't forget that the CD Sunday Challenge is about making items using something printed from a craft CD Rom. You can use other craft items on your card/project, such as a stamp or die, but you must include something from a craft Cd. So if you like colouring stamped images or digis you can still enter the challenge but you must include something from a Cd such as a backing paper, a sentiment or a butterfly for example. In your blog post/Facebook entry you must give the name of the Cd you've used. This is important if the items you've used can be bought as a download as well as a CD as the Design team can't tell which has been used unless you tell us. Your entry can't be considered for a prize if you haven't used a Cd or if you haven't told us the name of the CD in your post. The Design team still leave comments on your blog but there's no chance of winning if the above hasn't been followed. We now have a Facebook page if you don't have a blog.


Sunday 1 April 2018

CD Sunday - No Patterned Paper

Thanks to everyone who entered my Rabbit, Rabbit theme last week. I'll be looking through all the entries again to try and pick a Top Three - I don't think it will be an easy task!
This time at the CD Sunday Challenge it's Meg's turn to choose a theme and she's gone with No Patterned Paper. I think all the design team have gone with an image from a craft CD (I'll have to read all their blog posts to check) whereas I've gone for a plain paper as my item from a CD.


I've had to take a photo of the card with it lying flat in order to show the inside behind the cut away front.
There were a lot of stages to this card that needed to be done in the right order so I made a prototype first. This is something I do quite often if I'm not sure how the finished card will look. I either use cheap plain white card or if I've used good cardstock I'll cut out any good parts and use them for another make.
The starting point for this card was a new item I'd bought made by Marianne Design. It's called 'Design Folder Deluxe - Anja's Flower Border DF3444'. You get an embossing folder (I think it's 6 x6) that has two different designs - one at the top and one at the bottom. There's also a die that matches the top half of the folder and a strip die with a wavy edge. There's currently 2 different designs in this range and they're both really pretty. But enough of the advertising LOL!
The first thing I did was to line the inside of the card with a paper from a Creative Crafting World CD. It's called Perfect Papercrafting Companions, Disc 2 and the colour I picked was called Seafoam - a really pretty green. I then used the embossing folder to emboss a piece of card and as I wanted a bit of shimmer I used Centura Pearl Snow White A Hint of Silver. I trimmed it to fit the card blank, turned it sideways and chopped off the corners! This was glued over the green paper and I die cut corners from the same card stock and glued them so the green paper showed through. The corner dies where in a set of dies called Marianne Design Creatables Petra's Heart. To finish the inside I printed the same green paper onto white card and then die cut a mat for the sentiment. The mat was cut using another Marianne Design Creatable set - Large Oval by Petra LR0240. The sentiment is a Tattered Lace die free with one of their magazines.


That was the inside done - now to tackle the front!
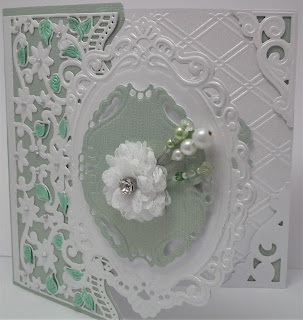
I covered half the front of the card blank with the green paper and after checking the size of the flowery die I die cut the wavy edge. I then cut and embossed the flowery die from the Centura Pearl card stock and glued it to the front of the card. I then went back to the Large Oval die set and cut out 2 mats - the larger from the Centura Pearl card and the smaller one from the green paper printed onto white card. I glued the larger oval onto the front of the card, overlapping the flowery die a little and tucking it under some of the flowers and leaves. It felt a little flimsy so I cut another large oval from plain white card and glued it to the back to strengthen it. The smaller green oval was then layered on to the larger oval using foam pads.


I then glued a ribbon flower with a gem centre to the front and pushed some handmade hatpins into the silicon glue. I finished the card off by adding clear gems to the centres of all the flowers in the die cut and colouring the leaves with a Promarker. I ran out of tiny gems and think the ones I used for the smaller flowers are too big. I also don't like the colour green (Mint Green) I used for the leaves but ran out of time to change it. Before I give the card to anyone I'll probably change the gems and try and recolour the leaves.
This is a side on photo with the card slightly open.


Don't forget that the CD Sunday Challenge is about making items using something printed from a craft CD Rom. You can use other craft items on your card/project, such as a stamp or die, but you must include something from a craft Cd. So if you like colouring stamped images or digis you can still enter the challenge but you must include something from a Cd such as a backing paper, a sentiment or a butterfly for example. In your blog post/Facebook entry you must give the name of the Cd you've used. This is important if the items you've used can be bought as a download as well as a CD as the Design team can't tell which has been used unless you tell us. Your entry can't be considered for a prize if you haven't used a Cd or if you haven't told us the name of the CD in your post. The Design team still leave comments on your blog but there's no chance of winning if the above hasn't been followed. We now have a Facebook page if you don't have a blog - The CD Sunday Challenge.  

I'd like to enter this card into the Creative Crafting World challenge.